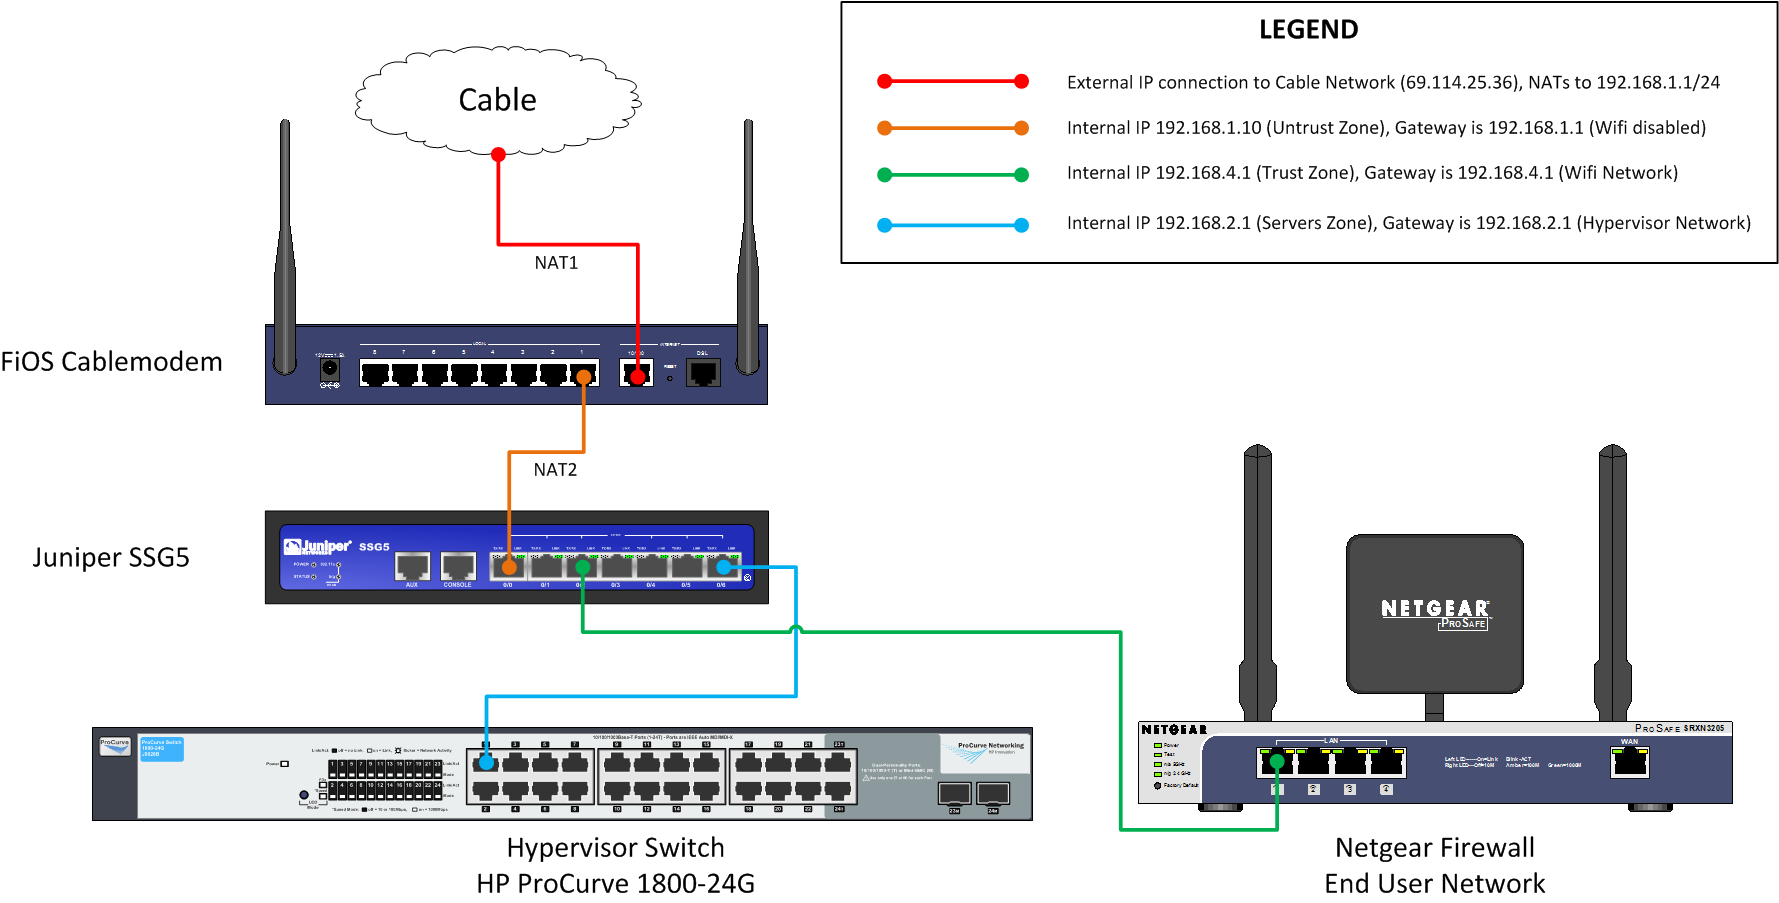
This is essentially the schema of what we are trying to do. Since we are running this in our house (or a dedicated WAN possibly at an office), I had a need to separate the server production subnet (at least in my nomenclature) vs the end-users (such as my wife and kids). I could have left everyone on the wifi network that comes with the FiOS cablemodem, but that would leave them on a network that potentially could be hacked if my security was wrong on one of my servers. And that’s no fun.
So what I did was create several zones in our SSG firewall. The first zone is the Untrust which connects to the FiOS router (this is the first NAT, as the FiOS router converts the external IP to 192.168.1.1). In our setup here we will consider this the “Untrust” zone because this is the last hop to the internet, as far as our servers are concerned.
The hypervisor network has its own zone created, called “Servers” in the Juniper. You can use the default DMZ subnet that comes with the Juniper, but I like rolling my own. I’ll go into how I configured the SSG5 on its own page, just going over the logical diagram of what we are doing here.
The last zone is the default “Trust” zone which is builtin on the SSG for the workstation subnet. Junipers use something called policies to permit access from one zone to another. By default, the Trust zone has access to Untrust (effectively means that the Untrust zone can browse the internet). In order for someone to reach either the Trust or Servers zone from the outside, a policy must be created to permit that kind of access. By default, I recommed keeping all security tight, and creating policies as they are needed. This keeps the only ports open you need.
Of course you will run into situations where you are not sure what ports a device or service uses, in which case you will open an “All” policy setup, so you can sniff the traffic to see what ports are in use. This should be just for discovery purposes, and the policy should be tuned immediately thereafter. Don’t make the lazy mistake of leaving an “Any” policy somewhere, it WILL bite you, sooner or later.
By default we will use the following policies right out of the box:
- From zone Trust to Untrust: Any destination, any service
- From zone Trust to Servers: Any destination, any service
- From zone Servers to Untrust: Specific devices, specific services
- Example 1: Server Punisher (DNS) will have Destination: Any, Service: DNS
- Example 2: Server Warlock (Apache) will have Destination: Any, Services: HTTP, HTTPS
What the above setup gives us (at least to start) is that any Trust workstation can reach any production server, and the internet. The Server subnet can reach only specific services on the internet, depending on which service is assigned (and you can create custom services). The above examples are to illustrate the added security of Punisher being able to route DNS queries (but not being able to access the internet) and Warlock being able to respond to web queries only. This is where the Any/Any policies can hurt you, as once a server is compromised, it can access a whole lot of devices unless you have it locked down for access. You can lock down the subnet so that certain servers cannot even see other servers (and we will, when the time comes).
A snapshot of the logical network schema is below. We will go into the Hypervisor subnet on its own page, as well as the SSG configuration. You can click on the picture below if it is hard to read, it should zoom to full size.